Windows 10: Virtual Desktops
Windows 10: Virtual Desktops
Lucidica is the IT support team for London businesses.
Thanks for viewing this page, hopefully it helps you solve your technical issue if not feel free to drop us a line here and we’ll provide additional help and support.
![]()
One of my favourite features of Windows 10. Virtual desktops were finally added as a built-in feature. If you’ve used Linux or Mac, you know this can be a very useful feature. Virtual desktops let you segregate your open apps into discrete areas – literally multiple, virtualized versions of your PC’s desktops.
How to use:
The virtual desktops feature can be located on the Taskbar or accessed by pressing Windows key + TAB.

This brings up the Task View interface, where you can see your open windows on virtual desktops you’ve added. When you open the Task View interface for the first time, or you only have one desktop, the ‘Add a desktop’ button is available. Click it to add another virtual desktop.
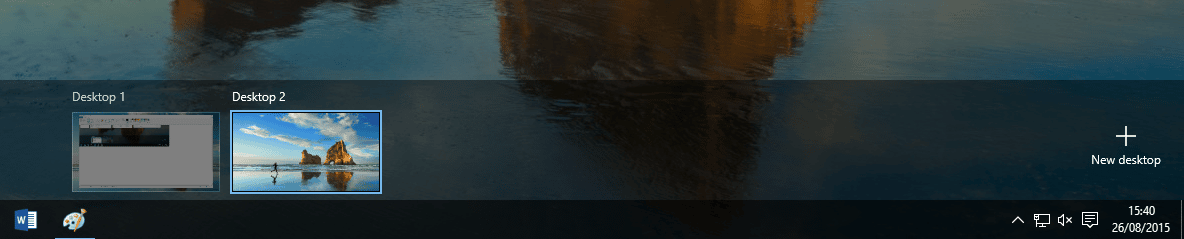
Now, when you click the ‘Task View’ button, all your desktops display on the Task View interface.
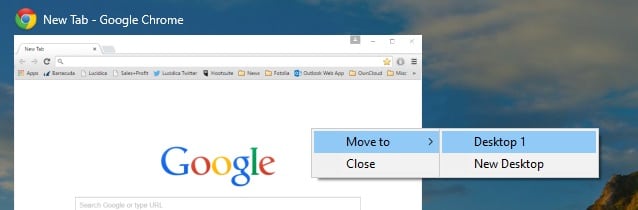
You can move programs among the different desktops you’ve set up. To do so, switch to the desktop containing the program you want to move. Click the ‘Task View’ button on the Taskbar. Right-click on the large thumbnail for the program you want to move, select ‘Move to,’ and then select the desktop number to which you want to move the program.
You can learn about the keyboard shortcuts for Virtual Desktops on our Windows 10: Fresh Keyboard Shortcuts page.
Hope this helps!